I wanted to replace the fuel pump on my 351 Cleveland. Not so much because it's broken but to rule out the pump as a cause for low fuel pressure.
So here we go. Since I don't have a ramp I can't reach from below so I need to dig in from above, where we encounter the first obstacle: the powersteering pump.
The powersteering pump is attached with 2 bolts only, one of them is used to put tension on the belt.
It's not hard to get the bolts out. but you do need to put the pump somewhere though. I didn't want to take off the hoses so I lifted it and "parked" it against the PCV valve.
There it is, ye olde pump ;-) To remove it you need tools in American sizes. I actually had small sized wrenches which came in handy in the little space available.
Don't forget to put a bucket or something underneath. I was afraid of fuel pouring out of the main fuel line so I first cut a new hose to connect the mains to the pump. I clamped a bolt in one end of the new hose (as shown in the picture above) and after disconnecting the the old hose from the mains I quickly connected the new hose. In the end I didn't need to rush things because only a tiny amount of fuel came out... So then I had the main fuel line sealed off which allowed me to continue working on removing the pump.
Removing the actual pump is real easy. It leaves you with a hole like this. You gotta clean it up a bit and make sure no gasket remains are left behind.
Old pump (made in Canada) and new pump (made in the USA).
So after the surface is cleaned you put the new gasket in place.
Then you have to put the new pump back in. Notice that the lever sticking out of the pump is not exactly in the middle. Here's a little tip: When sliding the lever inside the engine, keep it to the left a bit, not in the middle as you'll hit stuff and won't get very far. Point it to the left slightly and it will slide right in.
Finish off by connecting the hose and secondary fuel line (going up to the carb).
All that's left now is to put back the powersteering pump.
When everything was done I had to crank 4-5 times for about 10 seconds to get fuel into the empty system so it would start.
A blog about finding and keeping my 1973 Mustang Grande (V8 - 351C 2V). Produced on July 6, 1973. Sold in Florida, USA.
Saturday, November 28, 2015
Saturday, October 31, 2015
The kickdown connection
I bought a carb spacer but then figured it may create a problem for the kickdown rod, which it seems to do. Now that I needed to check that, I used the opportunity to finally look at how the kickdown actually is hooked up and how it's operated.
When the throttle lever is being pulled all the way, it pushes the kickdown rod along with it. The kickdown adjusting screw can be used to make sure the kickdown rod is about half a mm before it's end of movement when the throttle is wide open.
You can see how it's hooked up in the above picture. Below you see a short movie clip in which you can see how everything moves.
Tuesday, May 26, 2015
Trunk update
Cleaning up of the trunk has officially started now! :-)
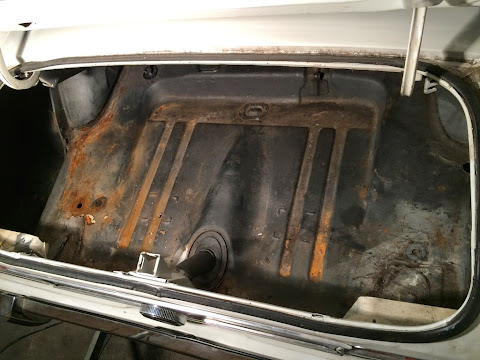
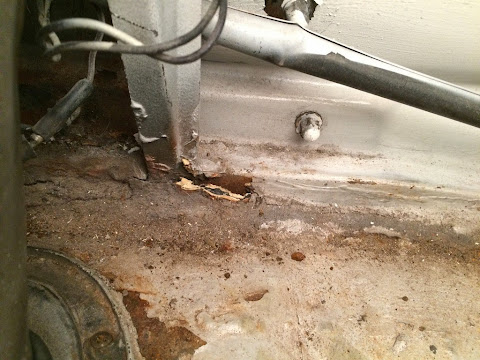
I've started to remove old body sealant in places with rust. Most rust is on the rear left side. This is around the wheel well.
Also underneath the left taillight there's some rust. I have yet to find out how to get rid of the rust in hard to reach spots...
I couldn't do too much today because the batery of my drill was empty and so was the second battery, grrrrrr.
Thursday, May 21, 2015
Project trunk has started
My trunk is rusty. 90% of this rust started after some twats from the winter-parking put it outside in the rain eventhough I asked them not to. When I picked up my car the outside was dry but there was a small puddle in the trunk and I only discovered so after I drove to the current parking. Crap!
So today I started preparing the trunk for sanding and painting. But I also wanna know what these wires are for:
?
This is what the trunk looks like right now. Too much rust...
It's still surface rust so I should be able to sand it away and paint over it.
Behind the filler-neck.
There is this soft, white, rubbery substance in the corners everywhere. I don't know what this is...
My paint also arrived today. In convenient spray-cans :-)
Tuesday, May 12, 2015
Back from the garage
Today I went to pick up my car from the garage. I budgetted about a grand for a few big things and some minor work. The only new expensive part required was the Edelbrock carb which I had already bought a while ago so most of the budget was going in to labour.
So a few weeks ago I took my car to Pro Street, in a town called Heemskerk. I had a few things I wanted to get done and I told them to let me know of any things that needed work in their opinion. So in the end this is what got done:
- Replaced the Holley with my new Edelbrock carb
- Emptied and cleaned the tank
- Put in a fuel filter (why did I not have one???)
- Fixed my seat (it was a bit loose)
- New distribution belt
- New brake shoes + brake cylinders in the back and fixed the drums
- Fixed the front brake calipers (both were loose and rattled they discovered)
- Replaced a support rubber for my gearbox
- Added some oil
- Re-calibrated ignition-timing
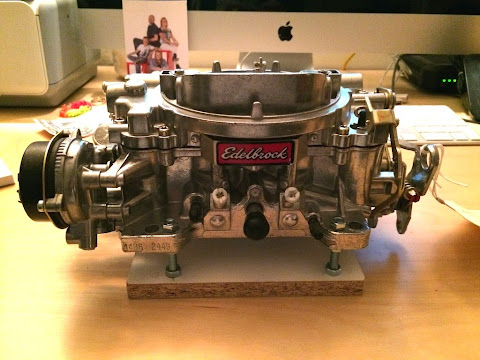
Here are a few pics of the new carb:
Is it OK to have the fuel filter lying on top loose like this? Is it bad that it is shaken about while driving?
Hooking up the gas-cable and the kickdown-rod was not easy they said. This was because the Edelbrock is a much wider carb than the Holley. But they did it in the end and it works fine. It made me think though that although the Edelbrock may be a fine carb, the Holley is perhaps a better match for this car + engine....
One thing I was wondering about is this wiring lying on top of the manifold, which gets quite hot when driving. Is that OK?
The drive home was smooth. Handling has improved. The engine sounds better and braking has also improved. It was very enjoyable and my confidence in the car has increased a lot. Good times!
Here are a few more glamour shots ;-) (Click them for jumbo-versions)
Monday, April 13, 2015
"De Liede" shoot
The weather was great and I really wanted to get the old wheels spinning a bit so I went to my car and took it outside.
It was a nice little drive with a small photoshoot half way. Here are some pics, click them for the original size. I hope you enjoy them :-)
This last one is my favourite.
Now also available without the tree! ;-)
It was a nice little drive with a small photoshoot half way. Here are some pics, click them for the original size. I hope you enjoy them :-)
This last one is my favourite.
Now also available without the tree! ;-)
Saturday, March 21, 2015
Edelbrock 1406 + 1483
This week I got myself a refurbished Edelbrock 1406 carburetor and the throttle lever kit for Fords. I'm going to have a garage put it in because if I'm gonna do it myself it's going to take months. The garage will also do some other things but that's for a later post.
Here are pics of the Edelbrock 1406 carb:
Front.
Top.
Choke-side.
Rear.
Throttle-side.
Top with open choke.
I got the Edelbrock 1483 throttle lever kit. This kit is for putting the carb in Ford cars.
This is how it's mounted. It's basically screwed against the lever that's already there. It has mounting points for the throttle cable and the kickdown rod leading the auto-tranny.
That's what it should look like.
Saturday, February 21, 2015
Replacing the filler cap
One thing that's been on my wish list for a long time, is to replace this old filler cap. The plastic glass is so cracked that you can hardly see the horse, which is a shame of course.
One of my birthday gifts from friends and family was this new filler cap. Looks a lot better don't you think?
Yes, it does! :-)
I looked around a bit more and noticed this little thing that sits at the bottom of the engine, I think just on top of the crank. What is it?
And in the electrical department I found this loose connector. it looked like it had been in use once. What was it for? Hmm...
And finally I noticed my seat is loose and the discovered that this nut isn't fixed all the way. However, when I try to fasten it, the whole thing spins along. I looked underneath the car to see if I could keep it from moving there but I couldn't see anything. To be continued...
Saturday, February 7, 2015
Checking a spark plug and the distributor
I wanted to check a few things in the ignition system today, mainly the spark plugs and the distributor.
Actually I was thinking of just replacing all 8 spark plugs but getting the easiets one out was already such a pain in the ass that I just put it back and left the other 7 alone.
So I now know that there are ACDelco plugs in it and that the one I took out seems OK. Well, I think.
OK, yes?
Then I had a look in the distributor. I didn't know exactly how it works but when I found out I was pretty perplexed. So the blue thingy in the picture below just shaves against the copper contacts here? Really?
Not sure if this looks OK or not...
Subscribe to:
Comments (Atom)


