

Showing posts with label Carburetor. Show all posts
Showing posts with label Carburetor. Show all posts
Thursday, September 6, 2018
Re-setting the idle mixture

Saturday, March 19, 2016
Putting in a carb spacer
Finally it was time to put the new carb spacer in. I'd never removed a carburetor myself so that was pretty exciting for me. Removing a carb allows you to look into the intake manifold and I had no idea what to expect. I thought it would be very dirty inside because my old carb looked real dirty inside as well...
 So I got started.
 Removed the air filter.
 And removed the carb. Easy job really. There's not too much to detach before you can remove this type of carburetor.
So there was my first ever look inside any intake :-) It probably sounds like nothing to many of you but if you have never done any engine work this feels like you're taking the engine apart!
 The inside of the manifold is remarkably clean!
 I was going to add this carb spacer from Edelbrock. Hopefully this is going to keep my carb cooler and therefore give me less issues with vaporizing fuel during and after a drive.
 The bolts came with the spacer. I seperately ordered the gaskets. I like them blue ;-)
 When you're working with an open manifold, I think it's wise to put a cloth in so that nothing falls in to it. I can't imagine the shit you get into if for example, a nut drops in or something smaller and it falls into an open cylinder chamber. I think I'd get a panic attack...
 I cut one of the gaskets to fit the dual plane (2 hole) manifold. You don't want to have any unused gasket dangling which eventually can get sucked in to your engine.
 Adding the spacer itself.
 And a 4 hole spacer on top.
 Nice.
Nice.
 Then it was time to put the carb back. Also pretty easy.
 And finally the air filter.
After checking if everything was in the right place I cranked for just over 10 seconds. After a small pause I cranked again and the engine fired almost immediately. I was SO surprised with all the starting issues I had over the years.
I also took the car for its first spin this year. It's been hibernating during the winter here in the Netherlands. It was a really nice day and everything went great :-)


So there was my first ever look inside any intake :-) It probably sounds like nothing to many of you but if you have never done any engine work this feels like you're taking the engine apart!


After checking if everything was in the right place I cranked for just over 10 seconds. After a small pause I cranked again and the engine fired almost immediately. I was SO surprised with all the starting issues I had over the years.
I also took the car for its first spin this year. It's been hibernating during the winter here in the Netherlands. It was a really nice day and everything went great :-)
Tuesday, May 12, 2015
Back from the garage
Today I went to pick up my car from the garage. I budgetted about a grand for a few big things and some minor work. The only new expensive part required was the Edelbrock carb which I had already bought a while ago so most of the budget was going in to labour.
So a few weeks ago I took my car to Pro Street, in a town called Heemskerk. I had a few things I wanted to get done and I told them to let me know of any things that needed work in their opinion. So in the end this is what got done:
- Replaced the Holley with my new Edelbrock carb
- Emptied and cleaned the tank
- Put in a fuel filter (why did I not have one???)
- Fixed my seat (it was a bit loose)
- New distribution belt
- New brake shoes + brake cylinders in the back and fixed the drums
- Fixed the front brake calipers (both were loose and rattled they discovered)
- Replaced a support rubber for my gearbox
- Added some oil
- Re-calibrated ignition-timing
Here are a few pics of the new carb:

 Is it OK to have the fuel filter lying on top loose like this? Is it bad that it is shaken about while driving?
 Hooking up the gas-cable and the kickdown-rod was not easy they said. This was because the Edelbrock is a much wider carb than the Holley. But they did it in the end and it works fine. It made me think though that although the Edelbrock may be a fine carb, the Holley is perhaps a better match for this car + engine....
 One thing I was wondering about is this wiring lying on top of the manifold, which gets quite hot when driving. Is that OK?
The drive home was smooth. Handling has improved. The engine sounds better and braking has also improved. It was very enjoyable and my confidence in the car has increased a lot. Good times!
Here are a few more glamour shots ;-) (Click them for jumbo-versions)


So a few weeks ago I took my car to Pro Street, in a town called Heemskerk. I had a few things I wanted to get done and I told them to let me know of any things that needed work in their opinion. So in the end this is what got done:
- Replaced the Holley with my new Edelbrock carb
- Emptied and cleaned the tank
- Put in a fuel filter (why did I not have one???)
- Fixed my seat (it was a bit loose)
- New distribution belt
- New brake shoes + brake cylinders in the back and fixed the drums
- Fixed the front brake calipers (both were loose and rattled they discovered)
- Replaced a support rubber for my gearbox
- Added some oil
- Re-calibrated ignition-timing
Here are a few pics of the new carb:


The drive home was smooth. Handling has improved. The engine sounds better and braking has also improved. It was very enjoyable and my confidence in the car has increased a lot. Good times!
Here are a few more glamour shots ;-) (Click them for jumbo-versions)


Saturday, March 21, 2015
Edelbrock 1406 + 1483
This week I got myself a refurbished Edelbrock 1406 carburetor and the throttle lever kit for Fords. I'm going to have a garage put it in because if I'm gonna do it myself it's going to take months. The garage will also do some other things but that's for a later post.
Here are pics of the Edelbrock 1406 carb:
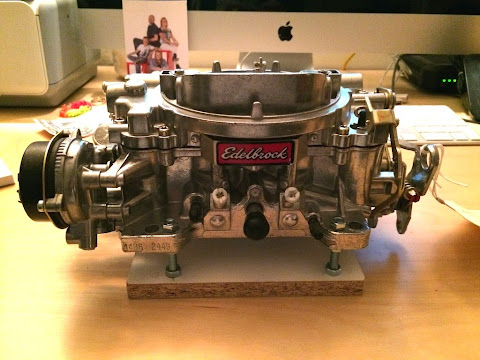 Front.
 Top.
Top.
 Choke-side.
 Rear.
Rear.
 Throttle-side.
 Top with open choke.
 I got the Edelbrock 1483 throttle lever kit. This kit is for putting the carb in Ford cars.
 This is how it's mounted. It's basically screwed against the lever that's already there. It has mounting points for the throttle cable and the kickdown rod leading the auto-tranny.
 That's what it should look like.
Here are pics of the Edelbrock 1406 carb:


Subscribe to:
Posts (Atom)