A blog about finding and keeping my 1973 Mustang Grande (V8 - 351C 2V). Produced on July 6, 1973. Sold in Florida, USA.

Wednesday, May 25, 2022

Removing the driveshaft

Preparing the car to cut out the floor, the driveshaft should be removed as well. It's also a key moment because the front and rear of the drive train get officially separated... It's not a hard job, at least it wasn't in my case.

I had the rear lifted a bit because the rear wheels are on dollies now. I could slide underneath the rear axle easy and get to the U-joint. To get the driveshaft out you only need to undo the nuts on the U-joint next to the differential, push the shaft forward a bit into the tranny so you can lower the rear and then pull it out of the tranny.

So starting this procedure with getting the nuts off of the U-joint:


And if they are not rusted and stuck, you have the shaft out within minutes:


Done!


Wednesday, April 6, 2022

Fixing (things around) the RH quarter panel

After having seen the state of my LH quarter and its surroundings I knew I could expect the RH side to be similarly crap. Although not very visible, if you don't look you will never know and I really really really don't want to drive around later in a great looking car having doubts about the state of sheet metal here and there. So it was time to dig in!

I started at the rear drilling out the spot welds that connect the quarter to the taillight panel:


Make very sure you mark your reference spots well! I used the point above the bumper indent for the width and the side marker for the height:


Time to start cutting! I removed the drop off first. It had visible rust holes so it was going:


Welding in a new drop off is straightforward:


Then it gets serious. You gotta be careful when cutting around the wheel well because there is a support structure sitting on top of the wheelhouse that you may not want to cut into. So take your time, look for it and make sure you cut right. And indeed, I found a LOT of rust that needed to go:


I learned from the LH side that the bottom of the quarter in front of the wheel is best left alone if possible, simply because cutting and drilling out spot welds there from the inside is a pain in the ass. So I had a good long look at the metal in that area and concluded it did not need replacing as there was only surface rust:


So I bought this new outer wheel well a while ago and now it was time to cut out a patch to replace the crappy rusted out edge. I do not want to remove the whole outer wheel well, too much work I think plus, you have to deal with that support structure that sits on top of it again:


Patch cut out and fixed in place:
 

After a weekend of welding the wheel well has a new rust-free edge:


Next up: fixing the new quarter panel's drop-off. Like so many pieces of "new" sheet metal it's usually put together pretty poorly. I had to put some extra spot welds in and add a little to the edge that sits under the wheel well because it was too short:


The rear where the quarter wraps around was a little too rusty. I did not want to grind everything away because it would remove to much good metal as well. So I used phosphoric acid to remove the rust. It worked like a charm:


OK, after test fitting about 30 times I was confident the new quarter was good and the body was prepped and ready. I attached it to the body with 2 rivets and a few clamps:


I cut the new and old sheet along the silver lines in one go but skipped a little bit underneath the rivets. Then I removed the patch and cut loose the old sheet that could go. Cutting this way gives a 1mm gap and a very well fitting patch:


In between I also came across some holes in the wheel well that needed closing:


Then it was time to tag the patch in place. I put rivets in the same holes as before so the patch was in exactly the same position. I added these super duper welding clamps to maintain a 1mm gap (almost) everywhere:


I took real good care of keeping the gap 1mm and having the sheet aligned perfectly everywhere. It paid off with a lot less warping. When I had enough tags I cut the sheet underneath the rivets and removed them. Then you simply carry on with tagging:


My office for a weekend:


Then there are also lots of plug welds that need to be made. I don't like doing them and I'm nog great at them (which is probably why I don't like them...). The ones one the wheel well edge were the hardest and I had about 8 actually popping off which I had to re do:


And then it's done:


Thank god there are only 2 quarters to fix!


Before and after:


I'm glad this one is done now. Next up is replacing parts of the floor. Oh dear, wish me luck!

Friday, December 31, 2021

Fixing the cowl

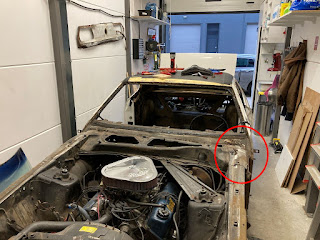
So in the meantime I removed the hood, windshield and wipers and now (May 2021) it was time to inspect the cowl, that's the area under the windshield. It's a hollow space designed to let air into the car (through the heater or AC) and the early Mustangs usually get rust holes in several places there. I started inspection on the LH (Left Hand) side in the red circle below.


And sure enough it didn't take long before I found a hole when looking from inside the car. The shit show was about to start... It's a shit show because getting new cowl panels is too expensive which means I have to patch. And because I do not fancy welding upside down from inside the car I had to go in from the top, which in the end wasn't bad because I found more rust holes in the parts I needed to remove.

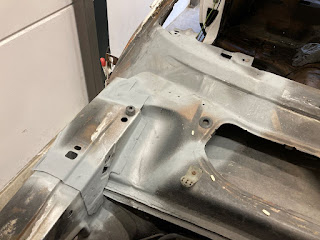
So this piece needs to be removed first which means drilling out about 25 spot welds in the shittest of places:


When removed the corner of the cowl shows itself, including unexpected extra rust holes where daylight hasn't been in nearly 50 years. Oh joy. Good times... Look:


To get to the main target area, the rust hole I spotted first from the inside, the corner needed to be cut open, showing a very crusty area:

The hole..

The metal around the hole was pretty pitted as well and beyond repair. So a larger patch was required. By now I had made a few patches so that wasn't too scary. I started putting duct tape on to create an overlay of the area to be patched:


I then created the patch out of an old piece of original sheet I cut out when working on the LH rear quarter. It worked out pretty OK:


Patch welded in place.

So, back to the corner. It appeared crustier than expected and it required 3 patches, one on each side: 


One patch on the side was a bit challenging but fun to make:


And here the patched up corner is welded back in place and sprayed with 3M welding primer:


Finally the top could be welded back. But only after even that was patched:


This part of the cowl took a lot longer than I figured before I started but these old cars are just full of surprises. And then to think mine is in pretty OK condition!

Welding done at the end of August 2021.

Nice.

Time to check out the other corner, same shit different location:


The RH (Right Hand) corner reveiling itself in all its crispy glory. 


After cutting it open and drilling out close to 30 spotwelds:


There we go, the numero uno of places where old Mustangs rust out first, the AC/heater air intake. They rust around the hat but in my case also at the back. It showed when I took my carpet out because the floor underneath it is crusty as well....

So this needs to be taken out.

There is something hanging of the bottom that will be cut out. The heater attaches to this so it will need to be put back in place after the patch is in. So I marked its location as well as I could:


Now the rusted out area can be cut out, leaving a big hole to be patched:


This was a cool patch to make, the biggest I made so far and it turned out well. Because I'm going to put back in a newer type of heater that round hole is not required anymore:


Welded in place. It is important to make sure the water flows off of it. That's why the level is there:

Make sure all water that comes in, flows to the corner.

The top needed some work as well. Three patches in total:


This has gotta be one of the funkiest patches I have created to date:


The patch on the side was a bit harder to make but turned out excellent:


Voila!

Below is a picture taken just before welding it back in. It needed a lot of plug welds, I hate plug welding, For some reason I can never fill the hole in one go...


But, it's back in and looking pretty OK. I could not rip it off so I guess it's welded back on alright!


Next up is preparing the top part so it can be welded back on. First it had to be straightened out and cleaned and then it received a bit of welding primer:


After putting it back on to be welded it becomes very visible howmany plug welds there need to be. More practice for me!

Holes on the outside.

More holes on the inside.

Plug welding all these holes went better than ever before:

Plug welded.

And the cowl is done: